아 쓴거 다 날아감 진짜 개빡친다!!!!!!!!!!!!!!!!!!

침착하자..... 침착하자..... 침착하자..... 침착하자..... 침착하자..... 침착하자..... 침착하자..... 침착하자..... 침착하자..... 침착하자..... 침착하자..... 침착하자..... 침착하자..... 침착하자..... 침착하자..... 침착하자..... 침착하자..... 침착하자..... 침착하자..... 침착하자..... 침착하자..... 침착하자..... 침착하자..... 침착하자..... 침착하자..... 침착하자..... 침착하자..... 침착하자..... 침착하자..... 침착하자..... 침착하자..... 침착하자..... 침착하자..... 침착하자.....
다시..... DiffableDataSource만 쓰다가 RxDataSource라는 것도 써보고싶어서.. (다시) 씁니다.. 실제로 비슷하니..
다시 쓴다.. 그래
기본적으론 UIKit에서 지원하는 DataSource를 통해 TableView, CollectionView의 데이터를 표현한다.
일반적인 상황(라이브러리 X)에서는 DataSource 메서드를 통해 데이터를 표현하지만, RxSwift를 통해 구현할 경우엔?
rx.items(dataSource:protocol<RxTableViewDataSourceType, UITableViewDataSource>)
rx.items(cellIdentifier:String)
rx.items(cellIdentifier:String:Cell.Type:_:)
rx.items(_:_:)
let data = Observable<[String]>.just(["first element", "second element", "third element"])
data.bind(to: tableView.rx.items(cellIdentifier: "Cell")) { index, model, cell in
cell.textLabel?.text = model
}
.disposed(by: disposeBag)이러한 메서드들을 통해서 데이터를 TableView나 CollectionView에 바인딩한다.
굳이 DataSource 프로토콜을 채택하여 메서드를 구현해줄 필요가 없게끔 만들어준 것이다.
하지만 이러한 편리한 점에도 불구하고 단점은 존재하였다.
여러 Section이 존재하거나, 데이터 추가/삭제/수정의 경우 단순히 ReloadData로 데이터를 바인딩하기때문에 애니메이션이 존재하지않아 UX를 떨어뜨린다는 단점이 존재하였다.
물론 애니메이션을 구현할 순 있지만, 구현 난이도가 어렵다고 한다~~
그래서 나온 것이 RxDataSource이다.
RxDataSource에서 제공하는 것은 다음과 같다.
rx.items(dataSource:)또한 여러 Section 에 대해 데이터를 설정할 수 있는 SectionModelType 프로토콜을 제공하고, 애니메이션을 제공할 수 있는 모델을 만드는 AnimatableSectionModelType 프로토콜과 DataSource 클래스를 제공한다.
뷰에 뿌려질 데이터 모델을 먼저 생성한 뒤, 해당 모델을 관리할 Section타입을 만들어 SectionModelType을 채택하여 사용하면 된다.
public protocol SectionModelType {
    associatedtype Item

    var items: [Item] { get }

    init(original: Self, items: [Item])
}
프로토콜 내부 코드를 보면 Section내부에 row로 사용될 데이터를 지정할 수 있는 것을 볼 수 있다.
그럼 바로 해보자..
struct MainData {
    let messege: String
}

struct MainDataSection {
    var header: String
    var items: [MainData]
}

extension MainDataSection: SectionModelType {
    typealias Item = MainData

    init(original: MainDataSection, items: [MainData]) {
        self = original
        self.items = items
    }
}
위에서 말한대로 먼저 Section내부의 row의 데이터로 사용될 모델을 먼저 정의한다.
그리고 Section 모델을 정의하여 items의 타입을 우리가 만든 row 모델로 지정해준다.
Section 모델의 header는 header Title이고, items는 Section의 row 데이터로 생각하면 된다.
그 뒤 DataSource를 만들어주면 되는데 그 전에 뷰를 만들어야겠지?
private lazy var collectionView: UICollectionView = {
    let collectionView = UICollectionView(
        frame: .zero,
        collectionViewLayout: configureCollectionViewLayout()
    )
    collectionView.translatesAutoresizingMaskIntoConstraints = false
    collectionView.register(cellType: MainViewCollectionViewCell.self)
    collectionView.register(supplementaryViewType: MainCollectionReusableHeaderView.self, ofKind: UICollectionView.elementKindSectionHeader)
    return collectionView
}()
이렇게 만들어 줬다. Cell과 Header를 등록해주었고 레이아웃 코드는 다음과 같다.
private func configureCollectionViewLayout() -> UICollectionViewLayout {
    let layout = UICollectionViewCompositionalLayout { _, _ in
        let itemSize = NSCollectionLayoutSize(
            widthDimension: .fractionalWidth(1.0),
            heightDimension: .fractionalHeight(1.0)
        )
        let item = NSCollectionLayoutItem(layoutSize: itemSize)

        let groupSize = NSCollectionLayoutSize(
            widthDimension: .fractionalWidth(0.5),
            heightDimension: .fractionalHeight(0.1)
        )
        let group = NSCollectionLayoutGroup.vertical(
            layoutSize: groupSize,
            subitems: [item]
        )

        let headerFooterSize = NSCollectionLayoutSize(widthDimension: .fractionalWidth(1.0), heightDimension: .absolute(30.0))
        let header = NSCollectionLayoutBoundarySupplementaryItem(
            layoutSize: headerFooterSize,
            elementKind: UICollectionView.elementKindSectionHeader,
            alignment: .top
        )

        let section = NSCollectionLayoutSection(group: group)
        section.boundarySupplementaryItems = [header]

        return section
    }
    return layout
}
이제 다시 본론인 DataSource로!!!!
open class RxCollectionViewSectionedReloadDataSource<Section: SectionModelType>
    : CollectionViewSectionedDataSource<Section>
    , RxCollectionViewDataSourceType
RxCollectionViewSectionedReloadDataSource의 제네릭으로 정의되어있는 타입은 SectionModelType을 채택해야함을 알 수 있다.
그 말인 즉슨 우리가 만든 Section모델을 넣어주면되겠쥐?
public typealias ConfigureCell = (CollectionViewSectionedDataSource<Section>, UICollectionView, IndexPath, Item) -> UICollectionViewCell
public typealias ConfigureSupplementaryView = (CollectionViewSectionedDataSource<Section>, UICollectionView, String, IndexPath) -> UICollectionReusableView
public typealias MoveItem = (CollectionViewSectionedDataSource<Section>, _ sourceIndexPath:IndexPath, _ destinationIndexPath:IndexPath) -> Void
public typealias CanMoveItemAtIndexPath = (CollectionViewSectionedDataSource<Section>, IndexPath) -> Bool

public init(
        configureCell: @escaping ConfigureCell,
        configureSupplementaryView: ConfigureSupplementaryView? = nil,
        moveItem: @escaping MoveItem = { _, _, _ in () },
        canMoveItemAtIndexPath: @escaping CanMoveItemAtIndexPath = { _, _ in false }
    ) {
        self.configureCell = configureCell
        self.configureSupplementaryView = configureSupplementaryView
        self.moveItem = moveItem
        self.canMoveItemAtIndexPath = canMoveItemAtIndexPath
    }
내부 코드는 이렇게 되어있다.
private var dataSource: RxCollectionViewSectionedReloadDataSource<MainDataSection>!

private func configureCollectionViewDataSource() {
    dataSource = RxCollectionViewSectionedReloadDataSource<MainDataSection>(configureCell: { dataSource, collectionView, indexPath, item in
        let cell: MainViewCollectionViewCell = collectionView.dequeueReusableCell(for: indexPath)
        cell.bind(item: item)
        return cell

    }, configureSupplementaryView: { (dataSource, collectionView, kind, indexPath) -> UICollectionReusableView in
        switch kind {
        case UICollectionView.elementKindSectionHeader:
            let header: MainCollectionReusableHeaderView = collectionView.dequeueReusableSupplementaryView(ofKind: kind, for: indexPath)
            let sectionTitle = dataSource.sectionModels[indexPath.section].header
            header.bind(title: sectionTitle)
            return header
        default:
            fatalError()
        }
    })
}
위에서 봤듯이 파라미터로 들어오는 것들을 사용해서 데이터를 할당해주면 된다.
근데 내가 첨에 뭐랑 비슷하다고 그랬었는데, 실제로 DiffableDataSource와 동일한 구조로 이뤄진 것을 볼 수 있다.
private typealias DiffableDataSource = UICollectionViewDiffableDataSource<HomeSection, Product>

private var dataSource: DiffableDataSource?

dataSource = DiffableDataSource(collectionView: homeCollectionView) { [unowned self]
            (collectionView: UICollectionView, indexPath: IndexPath, product: Product) in
            let cell = collectionView.dequeueReusableCell(
                withClass: YogiHomeCollectionViewCell.self,
                indextPath: indexPath
            )
diffable쓰면 얘 안써도 되는거임ㅋㅋ
타겟이 낮으면 이제 RxDataSources를 써야되는거지..
이제 데이터를 바인딩할 차례다.
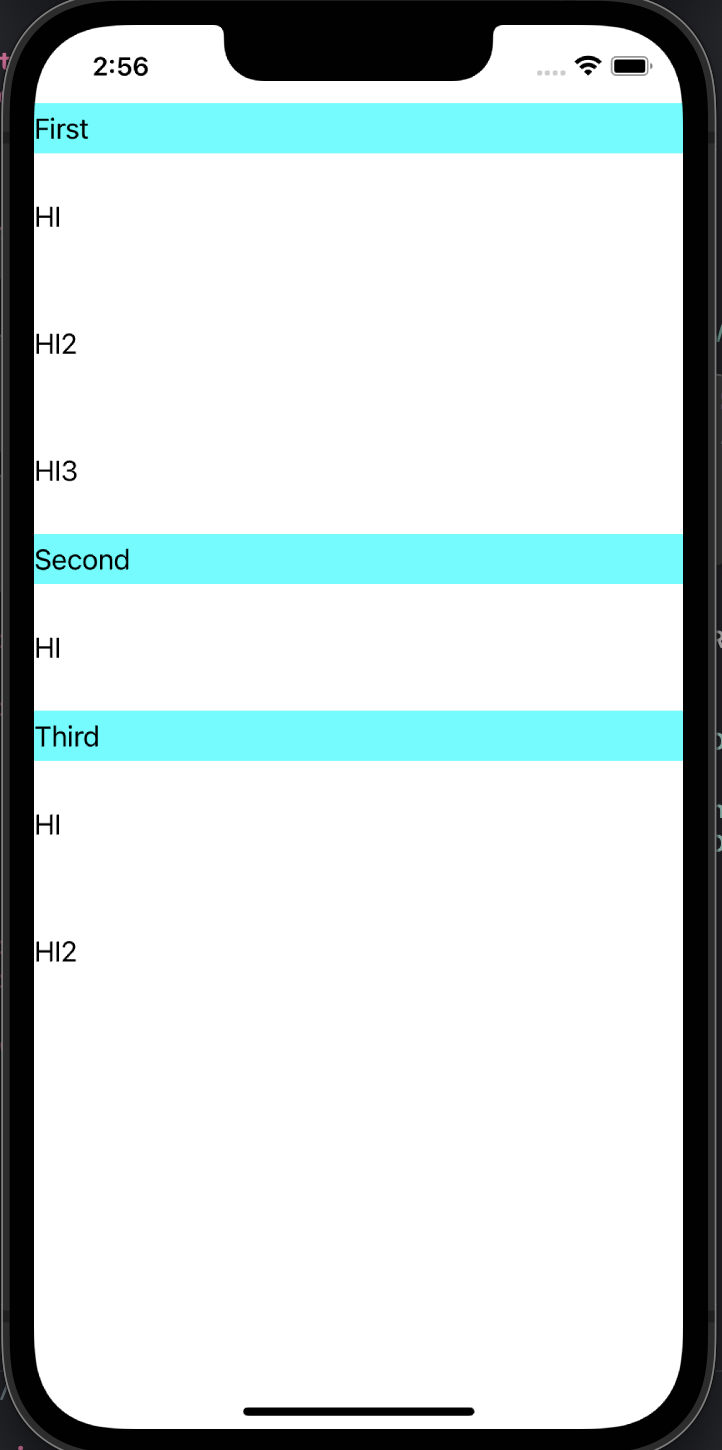
private let sections = [
    MainDataSection(header: "First", items: [MainData(messege: "HI"), MainData(messege: "HI2"), MainData(messege: "HI3")]),
    MainDataSection(header: "Second", items: [MainData(messege: "HI")]),
    MainDataSection(header: "Third", items: [MainData(messege: "HI"), MainData(messege: "HI2")])
]

private let sectionSubject = BehaviorRelay(value: [MainDataSection]())
private let disposeBag = DisposeBag()

override func viewDidLoad() {
    super.viewDidLoad()
   	view.backgroundColor = .white
    configureUI()
    configureCollectionViewDataSource()
    bind()

    sectionSubject.accept(sections)
}

private func bind() {
    sectionSubject
        .bind(to: collectionView.rx.items(dataSource: dataSource))
        .disposed(by: disposeBag)
 }
Relay를 만들어 해당 Relay를 바인딩하고, Relay에 새로운 값이 할당될 때마다 dataSource에 바인딩되어 위에서 만든 dataSource 로직을 타 데이터가 뷰에 렌더링되는 것이다.
Relay는 error와 complete 이벤트를 방출하지 않고 dispose될 때까지 동작한다.
이로 인해 사용자의 이벤트를 받는 것이 끊어지면 안되는 UI 이벤트 작업에 적합하다.

잘 적용된 모습을 볼 수 있다...
전체코드는 아래에서 볼 수 있다.
https://github.com/yim2627/RxDataSource_Practice
GitHub - yim2627/RxDataSource_Practice
Contribute to yim2627/RxDataSource_Practice development by creating an account on GitHub.
github.com
하나 쓰는데 우여곡절이 많았네.. ^^
'iOS > RxSwift' 카테고리의 다른 글
| [RxSwift] flatMapLatest (feat. flatMap) (1) | 2022.08.09 |
|---|---|
| [RxSwift] map vs flatMap (0) | 2022.08.09 |
| [RxSwift] concat (3) | 2022.07.26 |
| [RxSwift] Hot vs Cold Observable (0) | 2022.06.08 |
| [RxSwift] Observable, Dispose (0) | 2022.03.20 |


댓글